Friday, October 19, 2012

Fun With Hot Water Bottles

I love hot water bottle covers. Which is odd, because I live in the Sub-Tropics. Brisbane only get's about 2 weeks a year that you would need a hot water bottle cover. But I love to make them - I think because it's something fun that everyone can enjoy, not just kids.

Here's some of my favourites that I've made...


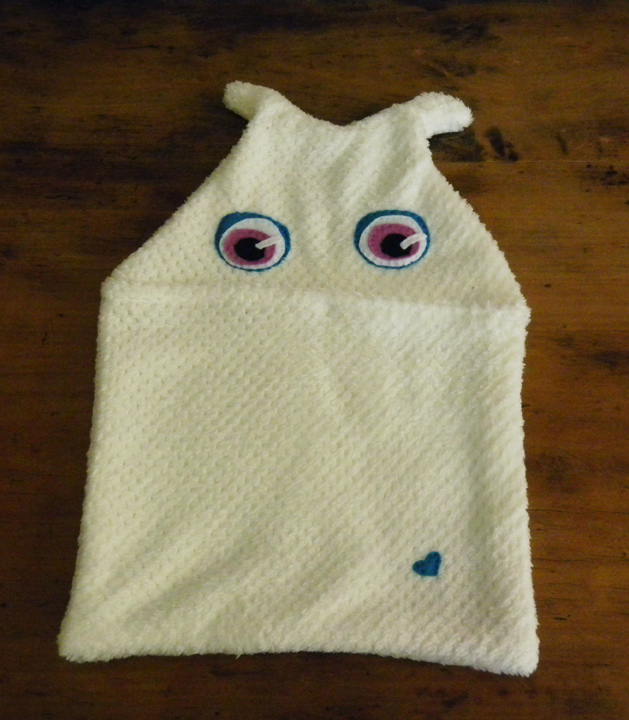
So monsters have been my major love - which I guess is because they really let you go nuts on creativity. But just the other day I had someone ask me if I could make a raccoon for them.

I'm not the type of person to say no to a challenge - I actually love making new things - so here's my steps to making a raccoon hot water bottle cover.


I made this little guy out of pre loved fabric - some herringbone pants that were useless as pants, but still had heaps of fabric in the legs to work with...


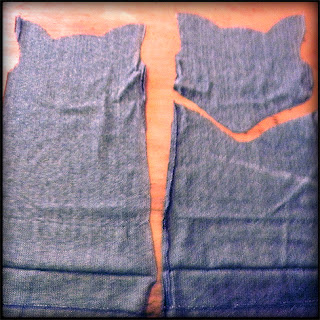
Step 1 - cut off enough from one of the legs to fit the water bottle.


Step 2 - I marked up the basic shape of the ears with chalk then cut out the design.
Note - leave a little extra fabric (about 2 inches) at the bottom of the back piece (that isn't cut). That way you'll have enough fabric in the mouth so that it stays shut when there's a hot water bottle in there.

Step 3 - Hem the two edges of the open mouth. I used a zig-zag stitch for this to prevent any stray threads getting away.

Step 4 - Sew the head onto the back, then sew the bottom on - remember you should have some overlap from the head onto the bottom of the body. Now you can turn this the right way out.


Step 5 - Go to town on your design. I use felt and just add shapes as I think it needs it. This is part of the reason why I sew them on after I sew the body together. If you want to, add these features before step 4. Also, I'm an illustrator by heart so I like to play around with shapes with it all laid out in front of me, which I find hard to do early in the process.

Step 6 - Enjoy your new hot water bottle cover!

This little guy sparked off some ideas for new designs... so I'm going to share a sneak peak with you here. In about 3 weeks these new designs will be in my Etsy shop ready for Christmas - so stay tuned... 


p.s. let me know if there's a style of hot water bottle cover you'd like to see


Sunday, October 7, 2012

DIY Cork Board Makeover

My desk tends to be a mess of post-it notes and scraps of paper stuck to any object that happens to be within my eye line. So I figured it was about time to get my act together and organise the mess.

I have a pile of old cork boards that I've had lying around waiting for me to put them to use, but they were looking kind of worse for wear. This tutorial is on how to fancy up your cork board so it looks great empty or full.

Materials

  • Cork board - you can use an old one or buy a new one.
  • Sandpaper
  • Adhesive remover (if you need to clean off any blue-tak or tape) - I use tea-tree oil, smells great and works like a charm
  • Acrylic paint in the colours of your choice

Step 1

Prepare the cork board. If you are using a new one, you will still need to sand down the edges to make sure the paint will adhere properly.

If you are using an old one it's time to get rid of any old staples and sticky things. I also did a light sand over the cork to smooth out any bumps that had appeared from years of thumb-tacks.

My old cork boards - definitely in need of a make-over

Step 2

Mark up your template. I used a geometric design made up of equilateral triangles (very popular at the moment). 

Don't worry about getting your trigonometry textbook out - you can download templates off the internet. And so you don't have to Google it, here's one I prepared earlier...


Step 3

Start painting! I went with a monochromatic palette - but you can use whatever colours you like. My tips here are to keep the colour scheme simple - either 2, 3 or 6 colours and work in a hexagon, keeping track of what colours sit next to the others. I created the design I wanted first in Photoshop so I knew what colours would be going where which I highly recommend - you can do this as a sketch on some paper, but having the basic pattern laid out will make things much easier in the long run, believe me.

Here's some tips on creating the design I used...


I also painted one colour at a time. This was because I was mixing the colours as I went and wanted to make sure they were all consistent. This method can make it more confusing to keep the pattern, so if you are doing this definitely have a mock-up of the pattern handy.

If you feel like you can't paint within the lines, use some masking tape. Though you will have to wait for the colours to dry before you start on the next one. A hair-dryer can come in very handy if you are feeling impatient.

Step 4

Paint the border a complimenting colour. You may have to use 2 or 3 coats to get it smooth and consistent. Allow to dry and you are finished!


Enjoy your crafting everybody.

Monday, October 1, 2012

Beating Procrastination

I'm going to admit the irony right up front with posting this while I should be doing an assignment this very minute. But my supreme lack of getting anything done this long weekend has made me put together an action plan for beating the procrastination demon.
What I should be doing, and what I am doing

1. Break it down

Things can seem pretty overwhelming if you just focus on the great big whole, and that's enough to make anyone run away and hide with 3 seasons of Buffy. If you break your task down into it's smaller components it becomes more manageable to tackle each step one at a time.

2. Make a plan 

Following on from breaking your task up the next step is list all those things you want to achieve in your time frame (I usually just do 1 day) and most importantly, make it realistic. Don't expect yourself to work for 8 hours solid, because it just isn't going to happen. But having a check-list of things to do gives yourself tangible aims and when you cross those off it feels damn fine.

3. Plan in procrastination

It's going to happen, you need to take breaks. The best way to overcome the "I just spent 4 hours watching television and I don't know how I got there," is to plan specific amounts of break time. You could give yourself one episode of a TV show, one chapter of a book, the time it takes to make a batch of biscuits. It doesn't really matter what, just as long as it's something that has a finite time attached to it so it doesn't vague into the entire day.

4. Commit your goal to someone else

There's been research that shows that if you vocalise your goals to someone else you are more likely to stick with them. Basically it's because you're not just breaking a promise to yourself (which is easy to justify) but to someone else who can hold you accountable. It's harder to back out of a commitment when there's someone else you are letting down by doing so.

There's loads of tips out there on this (but don't procrastinate by looking for procrastination tips). Here's a few that I found helpful.


Good luck on your goals everybody. If you have any winning procrastination tips I'd love to hear about them.